

TL;DR. A robotic palletizer is only as good as its gripper. Pick the wrong end-of-arm tool (EOAT) and you drop product, crush cases, or can’t pick the load at all. The #1 thing that decides which gripper you need is not the robot — it’s the surface of the package: flat vs uneven, porous vs smooth, oily vs dry, shrink-wrapped vs bare. This guide maps every common package surface to the right gripper, foam thickness, vacuum flow, and fork geometry, with real price ranges, the force and vacuum sizing math, and the 5 mistakes integrators make.
By Michael Zhang, Automation Engineer. Michael has specified EOAT for 60+ palletizing cells, including bag, case, tray, and coil applications.
1. Why the surface drives the choice
PMMI’s 2025 secondary packaging survey notes that 38% of robotic palletizer performance complaints trace back to the gripper, not the robot. A Fanuc or ABB arm can repeat to ±0.05 mm — but if the foam pad cannot seal on a dusty bag, repeatability is irrelevant.
The physics is simple: a vacuum gripper needs (a) a seal against the surface, (b) enough vacuum flow to hold the weight, and (c) material that does not leak. A flat corrugated case seals in milliseconds. A shrink-wrapped tray with ridges leaks 60% of vacuum. A woven polybag leaks through the weave itself. Pick the gripper to match the surface, not the other way around.
We have spec’d cells where a 120 kg-class arm sat idle for three weeks because the integrator sized a flat suction cup for a bag that would not seal. The fix was not a bigger robot — it was a foam cavity pad on a separate circuit, plus a bigger venturi. When you are on the integration floor and a cell is not picking, reach for the surface first, not the robot catalog.
Think of the seal as a dynamic event, not a static surface. On a flat RSC case, the pad hits, compresses 1–2 mm, and holds vacuum within 200–300 ms. On a shrink-wrapped tray with raised film bands, the pad hits, but the film deflects 3–5 mm and leaks at the band edges until the vacuum level can pull the film flat — by which time the cycle timer has already moved on. On a woven polybag, the weave itself is a network of 0.1 mm pores; air passes through continuously and no pump can keep up. These are not “surprise failures” — they are predictable, and they are why the surface-first question sits before the robot selection question in every good BOM.
The second reason surface dominates is that it fixes three other parameters at once: pad material, foam thickness, and vacuum level. Once you know the surface, those three follow. The robot payload, reach, and speed are still important — but they are chosen after, not before.
Real customer signal: Artur (Canada) on uneven-surface packs
In October 2026, Artur — a Canadian integrator we have been engineering a cobot palletizer with — asked us directly about the gripper for his customer’s uneven-top packs. He found this guide on sunaurakey.com, read it, and pushed back: “On your website there was a good guide on how to choose them but it didn’t go into details of the surface of the package and how that affects the choice.” Below is the actual WhatsApp exchange.
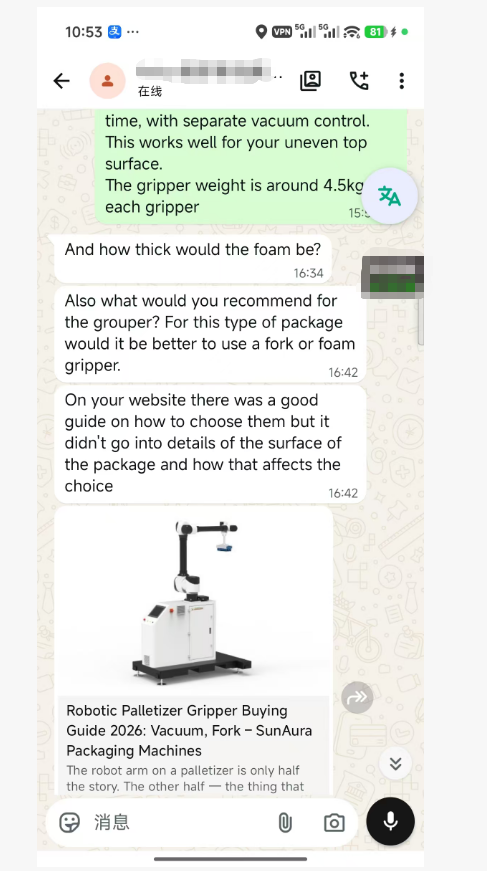
Our solution for his case: two foam cavity pads, one per pack, picking two packs simultaneously, each on its own independent vacuum zone. Gripper weight 4.5 kg, which fits his cobot’s 10 kg payload budget with margin. We sized the open-cell foam for his specific pack profile — not a one-size standard pad — so the seal holds despite the uneven top. That is exactly the “multi-zone foam pad for uneven surfaces” row in Table 2 above, and why we specified fork+vacuum combo only for tall/unstable loads rather than his short, boxy packs.
If you are specifying a gripper for uneven, multi-pick, or mixed-surface loads, send us your pack sample — we will size the foam, the vacuum flow and the pad count to your actual surface, not a catalog spec.
2. Four gripper types
| Gripper type | Price | Best surface | Payload per pad |
|---|---|---|---|
| Single vacuum pad (standard) | $800–$2,000 | Flat, rigid, smooth | 10–30 kg |
| Foam cavity pad (open-cell) | $1,500–$4,000 | Uneven, slightly porous | 5–20 kg per pad |
| Mechanical fork / hook | $2,000–$6,000 | Tray, open-top, porous | 15–50 kg |
| Fork + vacuum combo | $4,000–$9,000 | Mixed, unstable, tall | 20–60 kg |
| Side clamp / bilateral | $5,000–$12,000 | Shrink-wrapped bundles, bagged | 30–100 kg |
The table is a starting point, not a verdict. Pick the type that matches 80% of your SKUs, then accept that the remaining 20% either need a second tool, a tool change, or a hand-pick station. We have rarely seen a single EOAT handle 100% of a 15-SKU line without an adjustable frame or a multi-zone layout. Budget for that in the design, not as a surprise after FAT.
A few trade-offs worth naming. Single flat pads are cheapest and lightest, but they only work on one surface type — if your line mixes RSC cases with shrink-wrapped trays, the flat pad will leak on the trays and you will be tempted to over-vacuum, which crushes the cases. Foam cavity pads cost 2× more but absorb surface variation for free. Mechanical forks are the most reliable on porous or oily product, but they require a flat, accessible underside — open-top trays or shrink-wrapped bundles with no bottom band will not support a fork. Side clamps are the most expensive and the heaviest, but they are the only option for shrink-wrapped bundles where neither top nor bottom gives you a clean grip surface.
3. Surface-by-surface decision guide
| Package surface | Recommended gripper | Why + engineering note |
|---|---|---|
| Flat RSC corrugated case, dry | Single flat vacuum pad | Seals instantly, cheapest. A 50–80 mm bellows cup at -55 to -65 kPa is enough for a 10–20 kg case; the board is rigid, so seal area is near 100% of pad footprint. |
| Case with top printing/ridges/tape | Foam cavity pad (10 mm open-cell) | The ridges and tape break a flat-cup seal by 30–50%. 10 mm open-cell foam compresses 30–40% on contact, bridging tape edges and print curls while still pulling -40 to -55 kPa. 5 mm foam is too thin for deep print curls; 20 mm wastes payload. |
| Uneven top: bags, buckets, pails | Foam cavity pad, multi-zone vacuum | A bucket top has a 5–20 mm crown and rib profile. Multi-zone means each pad has its own venturi and vacuum switch — if one pad on a 2-pick loses seal, the other zone keeps holding. Run -50 to -65 kPa; foam leaks by design, so you need flow, not just level. |
| Porous: wood, particle board, burlap | Mechanical fork or side clamp | Air passes through the substrate itself; even -90 kPa cannot maintain a seal because the leak rate exceeds the pump flow. Forks support from below, where load path is most predictable. Serrated tips bite slightly into the wood to prevent slip during accel. |
| Oily/wet: meat, seafood, chemical drums | Serrated side clamp + fork | The oil film lowers friction to 0.15–0.25 and vacuum cups slip because the film breaks the air seal. Mechanical grip through rubber-faced or serrated plates, with torque-rated clamp force, is the only repeatable answer. Add drip trays — oil migrates onto the tooling and stays. |
| Shrink-wrapped tray / bundle | Side clamp on film band | Shrink film is smooth but stretches, so vacuum on top is marginal and the film can balloon under suction. Clamping on the sealed film band — where the bundle is rigid — transfers load through the film itself, which is engineered to hold the bundle together. Pad on top only as a hold-down, not the primary grip. |
| Tall/unstable loads (e.g. 1.8 m bags) | Fork + top vacuum hold-down | A tall bag has a high center of gravity; at 0.4–0.6 g robot accel it tips unless side support exists. Fork slides under the bag, top pad pulls it down onto the fork. Treat the top pad as hold-down only — 20–30% of total holding force comes from vacuum, the rest from the fork. |
| Multi-pick (2 packs at once) | Dual foam pads with separate vacuum circuits | One shared circuit means a single leak on pack A pulls vacuum down across both pads. Independent venturis per pad isolate the fault: pack B still holds. Each pad gets its own vacuum switch wired to the robot E-stop input. This is non-negotiable on multi-pick cells. |
4. Foam pad thickness: what actually matters
Open-cell polyurethane foam is the conformable layer that bridges the gap between a rigid pad and an uneven surface. Thickness is not a preference — it matches surface roughness:
| Foam thickness | Best surface |
|---|---|
| 5 mm thin foam | Mostly flat cases with minor tape/printing |
| 10 mm standard foam | Mixed case sizes, light ridges, shrink-wrapped trays |
| 20 mm thick foam | Highly uneven: bags, buckets, pails, irregular tops |
Thicker foam conforms better but (a) reduces effective payload — the foam compresses and the center of gravity shifts, and (b) wears faster. For a dual-pick application like the Canadian customer’s 2-pack: two 10 mm foam pads, each with its own vacuum generator, is the standard spec. Each pad ~4–5 kg EOAT weight, well within a 12–20 kg collaborative or light industrial robot’s capacity.
Two practical notes. First, foam density matters as much as thickness: 30–40 kg/m³ open-cell is the palletizing range; softer foam conforms more but tears on sharp box edges. Second, the foam is bonded to an aluminum or carbon plate. The plate must be flat within 0.5 mm over its length — a warped plate leaks at one corner no matter how good the foam is. When you receive a pad, lay a straightedge across it before install.
Foam fails in three predictable ways. It compresses permanently (you see a flat spot where the case sits), it abrades through on the leading edge (where the pad skims the case top during approach), or it delaminates from the plate (you see a gap at the bond line). The first two are wear — replace on schedule. The third is a bonding defect — send it back to the manufacturer, because it will repeat on every pad from that batch. Do not try to re-glue a delaminated pad on the line; the bond will fail mid-cycle and drop product.
5. Vacuum generator sizing
Do not size the vacuum pump by the pad count alone. Size by leak rate and by the holding-force math, not by a catalog “for up to X kg” sticker. The catalog number assumes a perfect seal on a perfectly flat steel plate. Your case is not that.
The holding-force equation
Theoretical holding force from a vacuum pad is straightforward:
W = P × A
where W is the theoretical upward force in newtons, P is the vacuum pressure differential against atmosphere (pascals), and A is the effective sealed area of the pad (square meters). Convert kPa to Pa by multiplying by 1,000. To get kg-force, divide W by 9.81.
Worked example. A 300 × 400 mm foam pad on a flat case has a theoretical seal area of 0.12 m². At -60 kPa (60,000 Pa differential), W = 60,000 × 0.12 = 7,200 N ≈ 734 kg. That is the ceiling if the seal were perfect. It is not. Effective sealed area on a real corrugated case is more like 60–80% of the plate, and on an open-cell foam pad on an uneven surface it drops to 30–50%. So you are really holding 220–370 kg in the example — still well above a 15–30 kg case, but the margin shrinks fast on porous or dusty product.
This is why the safety factor exists. Industry range for palletizing is 3–5× SF for normal horizontal picks, 6–10× for high-accel cells, layered bags, or unstable loads. Pick the SF first, then back-calculate pad area or vacuum level.
Vacuum level (kPa) vs flow (L/min) vs pad area
Three numbers move together and you cannot max all three. A venturi ejector trades flow for vacuum level:
- Flat corrugated case, dry (low leak): -55 to -65 kPa, 10–30 L/min flow per pad. A single-stage venturi is enough.
- Foam pad on uneven surface (medium leak): -45 to -60 kPa, 30–60 L/min per pad. Open-cell foam leaks by design; you need flow to hold the level despite leakage.
- Slightly porous edge / dusty bag (high leak): push to -70 to -85 kPa, 50–80 L/min per pad. Even then, performance is marginal — if leak rate exceeds pump capacity, switch to mechanical.
- Fully porous: wood, burlap, fabric bags: abandon vacuum; use mechanical grip.
A common spec mistake is sizing vacuum level for the flat catalog case and ignoring the dusty worst case. On a dry RSC, -60 kPa with 20 L/min is fine. On the same cell running a recycled-fiber case with loose fibers on top, the seal drops 15–20 kPa and the pump cannot keep up. Size for the worst SKU on the line, not the average. If the worst SKU needs -80 kPa and 60 L/min, the whole cell should run at that spec — you can always turn down the vacuum on the easy cases.
Individual suction-cup diameter typical range is 40–80 mm per cup for bellows-style pads. Larger cups (80–120 mm) are used on 20–40 kg cases but require more flow to seat. Foam cavity pads cover 150–400 mm square plates; the plate size sets the seal area, not the individual cup count.
Compressed-air supply matters. Most venturis run on 5–6 bar shop air and consume 10–40 L/min of compressed air per ejector stage. If plant air fluctuates below 4.5 bar, your vacuum level drops 10–20 kPa even though the ejector is “sized correctly.” Add a filter-regulator-lube unit within 2 m of the EOAT, and a 5–10 L reservoir if the cell is far from the main header.
Vacuum feedback
Add a vacuum switch on each zone. Set the trip at 70–80% of operating level. If pressure drops below threshold, the robot faults before dropping the load. This single feature prevents 90% of dropped-product incidents we have seen in the field. Skip it and you will find out you dropped a pack when it lands on the floor.
Venturi ejector vs central vacuum pump
Two ways to generate vacuum on a palletizer cell. Most integrators default to venturi ejectors mounted directly on the EOAT — one per pad, 5–6 bar shop air in, vacuum out. They are cheap ($50–$200 each), light, and fast (vacuum in 100–300 ms). The trade-off is compressed-air consumption: 10–40 L/min of shop air per ejector, continuously while running. On a 4-pad cell at 15 picks/min, that is 40–160 L/min of air — real money on a plant air bill, and a real load on the compressor.
A central vacuum pump (dry rotary vane or claw, 0.75–2.2 kW) is the alternative. It sits on the floor, runs at constant vacuum, and feeds all pads through a hose. Lower air bill, quieter, more consistent level. But it adds 20–50 kg to the cell footprint, requires a 20–40 m vacuum hose to the EOAT (which adds inertia and cycle time), and fails open — if the pump trips, every pad on the cell loses vacuum at once. We specify central pumps only on cells with 6+ pads running 24/7, where the air savings pay back in under 18 months. For 1–4 pads, venturi is the default.
6. Mechanical gripper force calculation
Forks and side clamps do not use vacuum. They hold by friction between the gripper face and the package. The math:
F_hold = μ × N × n × SF
where F_hold is the friction force resisting slip in newtons, μ is the coefficient of friction between gripper face and package surface, N is the normal clamping force per contact face (newtons), n is the number of contact faces (1 for a single fork side, 2 for a bilateral clamp), and SF is the safety factor, typically 2–4× for clamping, 3–5× for accel-heavy cells.
Typical μ values we see in spec:
- Rubber pad on dry corrugated: 0.4–0.6
- Rubber pad on smooth plastic / shrink film: 0.25–0.4
- Serrated steel on wood / concrete block: 0.5–0.7
- Bare aluminum on oily film: 0.15–0.25 — too low, always face with rubber
- PTFE / slippery coated surface: 0.1–0.2 — avoid clamp; use fork support
Worked example. A bilateral side clamp on a 20 kg bag. Required hold = 20 × 9.81 = 196 N. μ = 0.4, n = 2, SF = 3. Rearranged: N = 196 / (0.4 × 2 × 3) ≈ 82 N per side. That is trivial for a 40 mm bore pneumatic cylinder at 5 bar — but the margin shrinks fast under robot acceleration. At 0.5 g accel, dynamic force doubles, so your effective SF drops from 3× to 1.5×. We oversize the cylinder by 2× the static calculation and use a pressure regulator so the customer can tune clamp force to the weakest SKU rather than the strongest.
For forks, the load path is vertical support, not friction. Tip length should be 1.3–1.5× the pack footprint so the pack does not tip off the fork during transfer. Tip width 40–80 mm for standard cases, 80–120 mm for block or tile loads. Add a 5–10 mm radius at the tip so the fork does not saw into the case bottom when sliding under.
One tuning point integrators get wrong: clamp force is not “more is better.” Over-clamping crushes corrugated cases (losing 20–30% of case strength once the flute collapses), dents plastic buckets, and collapses shrink film so the bundle becomes unstable. Under-clamping slips. The right way: start at the lower end of the calculated range, run 20 cycles, then increase pressure in 0.5 bar steps until the pack no longer slips at full robot accel. Stop there. Tag the regulator setting and lock it. For multi-SKU lines with case weights from 5 to 25 kg, recipe-driven clamp pressure per SKU is worth the PLC effort.
7. Configuration checklist before you ask for a quote
- Send 5–10 photos of the actual product top surface, plus a cross-section of the case/bag.
- State the maximum weight per pack and per layer.
- State the minimum case/bag footprint (the gripper must fit the smallest pack).
- State whether the product is oily, dusty, wet, shrink-wrapped, or bare.
- Tell the integrator your cycle time target (picks per minute).
- Ask: is each pick zone on a separate vacuum circuit? (Required for multi-pick.)
- Ask: what is the EOAT weight? (Must leave >30% payload margin on the robot.)
- Ask: what foam grade and thickness? Get the datasheet.
- Ask: what is the spare parts price for a foam pad? (Wear item; expect to replace every 6–12 months.)
- Ask: can you provide a trial with our actual product before final purchase?
8. Five mistakes integrators make
- Specifying a flat pad on an uneven bag. It works for a week, then leaks and drops product. Use foam. The integrator usually “validates” the choice on a clean, new bag straight from the palletizer — which is the flattest the bag will ever be. After 24 hours on the line, bags pick up dust, sag, and deform. The pad that sealed on day one does not seal on day eight.
- One common vacuum circuit for a dual-pick. When one pack shifts, both drop. Use independent circuits per pad. This is the most common dual-pick failure we troubleshoot, and it is a $50 venturi difference — not a design fundamental. The integrator saves money on the BOM and the end user pays for it in dropped product.
- Over-sizing the robot but under-sizing the vacuum. A 120 kg robot on a 50 kg vacuum generator cannot lift porous cases. The robot is a one-time purchase; the vacuum system runs every cycle. Customers ask us about 200 kg robots for 20 kg cases — the robot is not the bottleneck.
- No vacuum feedback sensor. You find out you dropped a pack when it lands on the floor, not during the lift. A $100 vacuum switch wired to the robot E-stop input catches the loss in under 100 ms — the robot stops before it moves. Add it on every zone.
- Ignoring EOAT weight. A 20 kg robot with a 6 kg gripper has only 14 kg left for product — buyers forget the gripper itself counts against payload. Then they wonder why the robot faults at 12 kg product. Always subtract EOAT weight first, then product weight, then leave 30% margin.
9. Maintenance and wear parts
A palletizing cell is not a set-it-and-forget-it tool. The EOAT is the most worn component on the line, because it touches product every cycle. Plan maintenance from day one or you will be fixing it on night shift.
Foam and cup replacement
Open-cell foam pads last 3–12 months in production. The range is wide because it tracks pick rate and surface: dusty or abrasive product (building materials, recycled fiberboard) wears foam in 3–6 months at 15–25 picks/min. Clean dry RSC cases in a food DC can run 9–12 months. Inspect monthly. Replace the pad when you see any of: visible tears or compressed permanent dents in the foam, vacuum level on a known-good pack dropping more than 10 kPa from baseline, or a visible “pattern wear” where the foam has thinned on one edge. Bellows suction cups on flat-pad tools crack at the convolutions; replace as a set, not individually.
Filters and tubing
Run a 5 μm in-line vacuum filter on every zone. Replace every 6–12 months, or sooner in dusty environments (3 months is typical for brick, tile, or recycled cardboard lines). A clogged filter reads exactly like a bad seal — you will chase surface problems that are actually a dirty filter. Check vacuum tubing annually for cracks at fittings; a 1 mm hole at -60 kPa leaks 10–20 L/min, enough to drop a marginal seal. Re-torque push-to-connect fittings once a year. Listen for leaks at 1 m distance with the pump running — you will hear them.
Annual hours and spares budget
Budget 4–8 hours of planned maintenance per cell per year: pad swap, filter swap, leak check, bolt torque on EOAT fasteners, and a vacuum switch calibration against a gauge. Add another 8–16 hours of unplanned reactive downtime per year in the budget for the first two years — that is realistic, not pessimistic. Spare parts spend runs about 10–15% of original gripper purchase price per year. Keep one spare foam pad and one spare venturi on the shelf; lead time on custom foam plates is 2–4 weeks, and a cell down for 3 weeks costs more than a dozen spare pads.
Commissioning checklist on day one
Before you sign off FAT, run these with the customer present. Pick each SKU at full cycle speed 30 times. Measure vacuum level on a data-logger — it should stay within ±5 kPa of target through the whole lift. Pick a deliberately dusty or wet pack (the worst-case SKU) — if it drops, the EOAT is undersized, not the robot. Drop-test a pack on purpose at 1 m height onto a foam pad: if it does not break, your hold-down margin is adequate. Finally, ask the customer’s maintenance lead to swap a foam pad in front of you — if it takes more than 15 minutes or needs two people, the design is wrong for their team. Document the baseline vacuum level for every SKU on a sticker on the EOAT; that number is your future maintenance reference.
10. Scenario recommendations
| Application | Gripper |
|---|---|
| E-commerce 3PL, mixed RSC cases | Foam cavity pad 10 mm, multi-zone, automatic case-size changeover |
| Food bags / buckets / pails | Dual foam pads 20 mm, independent vacuum per pad |
| Building materials: bricks, blocks, tiles | Mechanical fork + side clamp; vacuum on dusty surface fails |
| Beverage shrink-wrapped trays | Side clamp on the film band; add top hold-down for tall stacks |
| 2-pack irregular consumer goods (the Artur case) | Two foam cavity pads 10–15 mm, separate ejectors, ~4.5 kg EOAT per gripper |
Pick the row that matches your dominant SKU, then stress-test it against your worst SKU (heaviest, most uneven, or oiliest). If the recommendation fails on that one, the cell needs either a second EOAT with tool change, or a different primary tool. Do not ship a cell that only works on the good SKUs — the bad ones arrive on day one of production.
11. Frequently asked questions
Got a surface you are unsure about? Send us the pack sample or five photos from top, side, and bottom. We will size the foam, the vacuum flow, and the pad count to your actual surface — not a catalog spec. That is how Artur’s case ended up with two independent foam zones on a 4.5 kg EOAT, and how most of our palletizer cells leave FAT without a dropped pack in the trial run.

Michael designs automated palletizing stations and ties upstream case or bag flow to downstream stretch wrapping. His work spans conventional layer palletizers, robotic arm cells, conveyor routing, safety fencing and handover logic between machines. He writes about palletizer selection, load stability and how an end-of-line sequence should be balanced.
See Full Bio ›